Polynomial parser in C++ using Boost.Spirit

Edit (07/07/2014): I’m sorry, the initial code compiled but didn’t work. It’s been updated now, along with the blog.

First of all, here is a link to the code. It depends on Boost.Spirit, which is a header-only part of the Boost library. It compiles, and it parses bivariate polynomials (e.g. xy^2 + 2x – 5y).

The input is a user-input string, and the output is a polynomial, which is represented internally as a vector of terms. A term has a coefficient and two exponents, one for each variable.

struct term
{
  boost::optional<int> coefficient;
  boost::optional<int> x_exponent;
  boost::optional<int> y_exponent;
};

So imagine the parser going over the string and processing each term individually, stuffing it into a vector. That’s exactly how the parser rules work.

The rules in the parser define how the user input is parsed, and we attach actions in the form of lambda functions to each rule to be executed when each part is parsed. It starts at the top with start:

 namespace phx = boost::phoenix;
 ...
 start = eps[_val = std::vector<term>()]
>> poly_term[phx::push_back(_val, qi::_1)]
>> *(
('+' >> poly_term[phx::push_back(_val, qi::_1)])
|
('-' >> negative_poly_term[phx::push_back(_val, qi::_1)])
)

First of all, rules have attributes, and the start rule’s attribute is std::vector of term‘s. The rule says that we should initialize with an empty vector, then expect to parse at least one poly_term (i.e. polynomial term).

The poly_term is another rule, whose attribute is term. eps is another rule that consumes no input and always matches.

Inside the brackets of each rule is a lambda function that does something with the attribute of the rule. For example, the rule for poly_term says to take the term, stored in the placeholder qi::_1, and stuff it into the vector that we initialized at the beginning.

A single polynomial term contains three pieces of information: the coefficient out in front, and the two exponents for each variable, and the next rule shows how to break it down.

 poly_term = eps[_val = term()]
>>
-int_[phx::bind(&term::coefficient, _val) = qi::_1]
>>
-x_term[phx::bind(&term::x_exponent, _val) = qi::_1]
>>
-y_term[phx::bind(&term::y_exponent, _val) = qi::_1]
;

First, we try to pick out the coefficient. int_ is a “primitive” Spirit rule that will pick up an int from the string being parsed. The action says that the int will be taken and assigned to the coefficient field of the term attribute of this rule.

Note that the coefficient is optional, as indicated by the dash outside of the parens. The Kleene operator in the start rule up above is another one, which matches any number of poly_terms. Here’s a complete list of the parser operators.

Somehow, it is quite beautiful to look at this code.

Diary #16: CPacking debs

I’ve been having fun packing .deb files, and it’s pretty easy to do with CPack once you’ve scrounged up the boilerplate that you have to copy and paste into your CMakeLists.txt. For example, here’s a sample minimal CMakeLists.txt that incorporates Boost filesystem:

find_package( Boost 1.49 COMPONENTS system filesystem )
include_directories( ${Boost_INCLUDE_DIR} )

add_executable( atBoostTest test.cpp )
target_link_libraries( atBoostTest ${Boost_LIBRARIES} )

install( TARGETS atBoostTest
    RUNTIME
    DESTINATION bin
)

set(CPACK_PACKAGE_NAME "atBoostTest")
set(CPACK_PACKAGE_VENDOR "atsui")
set(CPACK_PACKAGE_DESCRIPTION_SUMMARY "atBoostTest - test package with boost-based command-line program")

set(CPACK_PACKAGE_VERSION "0.1.0")
set(CPACK_PACKAGE_VERSION_MAJOR "0")
set(CPACK_PACKAGE_VERSION_MINOR "1")
set(CPACK_PACKAGE_VERSION_PATCH "0")

set(CPACK_GENERATOR "DEB")
set( CPACK_DEBIAN_PACKAGE_MAINTAINER "atsui" )
set( CPACK_DEBIAN_PACKAGE_DEPENDS "libc6 (>= 2.3.2), libgcc1 (>= 1:4.1.1), libstdc++6 (>= 4.6), libboost-dev (>= 1.49), libboost-filesystem-dev (>= 1.49)" )

message( STATUS "${CMAKE_SYSTEM_PROCESSOR}" )
set( CPACK_SYSTEM_NAME "${CMAKE_SYSTEM_PROCESSOR}" )

include( CPack )

Lines 1-10 are a typical project where you specify a target, dependent libraries, and installation instructions. Everything afterwards is CPack boilerplate that you can start out with.

The important one is probably the CPACK_DEBIAN_PACKAGE_DEPENDS, where you declare packages that your app depends on. This means that if you manage to write software using standard dev packages, you can just reference them here and users can install and run your deb just fine (see gdebi).

So that means that this works differently from the OSX bundle fixup workflow where a fully distributable, monolithic bundle is created by pulling in all dependent libraries instead of relying on a package manager to be able to fill in the blanks for you.

Another thing that I am excited to try out is that you can actually create a Windows installer. I found this SO question that seems to have the details as well. I will need to try this out with the MinGW build of my app.

Diary #1 – Looking through a Boost.Python project; Mesh repair

This is the start of my attempt to write a daily account of the things I do. There won’t be much in-depth detail in these diaries, and I’m mostly writing for myself so that I have some sort of continuity of thought that persists beyond one day, so I’ll put Diary in the title to make it easy for you, the reader, to quickly skip these if you want.

I have been looking into Boost.Python recently and today I looked at the CGAL Python Bindings project. In retrospect, I should have known when I saw the handmade Makefile and instructions for the previous major version of CGAL that I was getting into some old, unmaintained code. On the other hand, it is a good thing I went through the exercise of going through the code and compiling some parts of it. For future reference, the current Python wrapper project for CGAL is actually called cgal-bindings and actually uses SWIG. I still don’t really want to get into SWIG because it’s another thing I have to learn, and my project already incorporates Boost so I’ll stick to that.

The other thing that I spent most of my time on was repairing the skull meshes that we have in the lab. A lot of these meshes have twists, tangles, and foldovers that are really gnarly and I didn’t know how to deal with them until recently I learned a thing or two about Blender. I remember when I first opened Blender up, couldn’t find a way to import my .off file, and just wanted to close it and be done with it. Now, I know enough to be able to do what I want as far as untangling these contorted meshes. I repaired 7 today, and I think I can finish the remaining 10 tomorrow.

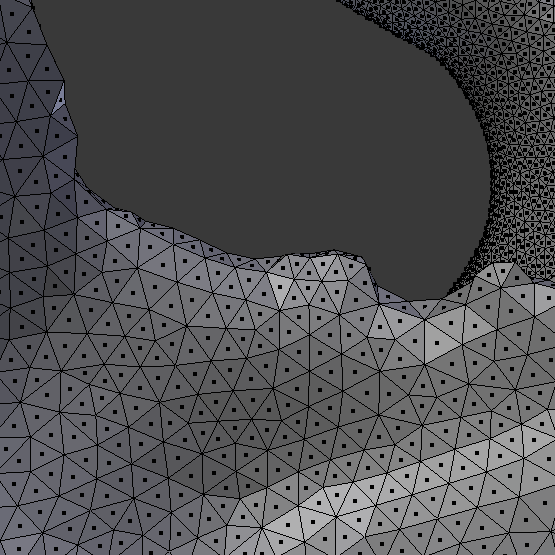
twistedMesh

Above is an example of a gnarly part of the monkey skull mesh. What happened is that a narrow U-shaped patch actually crossed over on itself to become something like the lowercase Greek letter gamma. Here, you’re looking at it from the side, and the highlighted triangles indicate where two faces intersect with each other — this doesn’t happen in reality, so I have to manually pull them apart. Of course, the other gnarly part is the sharp triangles along the ridge line. I write a program to flatten meshes, but it blows up if the input mesh has such configuration of triangles.

untwistedMesh

Here’s an example of what I’m able to do through Blender now. I can pull the sides apart so that the self-intersections go away, and I can clean up the tuft of triangles along the ridge. It takes a bit of time, and it’s up to you to rebuild the shape in a reasonable way. But I’m glad that I can fix it now. I might make a video to demonstrate the technique at some point.

I didn’t get to read as much as I wanted to today. I have a paper on my stack about LDDMM and hippocampus shape that looks interesting, so I’ll read it tomorrow. For general reading, I’ve been saying that I want to get back into reading Chinese, but I’m sick of just reading the news. I bookmarked two blog portals (here and here) that my friends linked articles from on Facebook. I’ll probably spend a bit of time just browsing for a blog or two in a category I’m interested in tomorrow.

Boost.Python hello world example using CMake

Somehow it seems I’m the only one among my labmates who is working mainly in C++/CMake and not Python. I want to do more than help them by discussing code — I want to share my code. So let’s use Boost.Python wrap our C++ library so it can be called from Python code. This tutorial is based on the Hello world example in the Boost.Python docs and uses CMake.

To begin with, here’s a mention of the versions of everything I’m using when I wrote this post so you can judge if stuff is still applicable:

  • Ubuntu 13.04
  • cmake version 2.8.10.1
  • gcc version 4.7.3
  • Boost 1.49 with Python component
  • Python 2.7.4

Here, we create a simple C++ library called libgreet, and we make a wrapper library called greet_ext. The wrapper library can be loaded as a Python module that exposes the function in the C++ library. The files are shown below, and the full example can be downloaded here. To use it, just download it and run these commands:

tar xf BoostPythonHelloWorld.tar.gz
cd BoostPythonHelloWorld
cmake .
make
./test.py

greet.h:

#ifndef GREET_H
#define GREET_H
char const* greet( );
#endif // GREET_H

greet.cpp:

#include "greet.h";

char const* greet( )
{
    return "Hello world";
}

greet_ext.cpp:

#include "greet.h";
#include <boost/python.hpp>;

BOOST_PYTHON_MODULE(greet_ext)
{
    using namespace boost::python;
    def( "greet", greet );
}
  • The parameter to BOOST_PYTHON_MODULE must match the name of the wrapper library we import in Python below. Note where greet_ext appears throughout the different files.

CMakeLists.txt:

cmake_minimum_required( VERSION 2.8 )

project( BoostPythonHelloWorld )

# Find necessary packages
find_package( PythonLibs 2.7 REQUIRED )
include_directories( ${PYTHON_INCLUDE_DIRS} )

find_package( Boost COMPONENTS python REQUIRED )
include_directories( ${Boost_INCLUDE_DIR} )

# Build our library
add_library( greet SHARED greet.cpp )

# Define the wrapper library that wraps our library
add_library( greet_ext SHARED greet_ext.cpp )
target_link_libraries( greet_ext ${Boost_LIBRARIES} greet )
# don't prepend wrapper library name with lib
set_target_properties( greet_ext PROPERTIES PREFIX "" )
  • The line with PythonLibs locates the python includes, which are necessary because the Boost.Python header pulls in a config file from there.
  • By default, CMake builds library targets with the lib prefix, but we actually want our wrapper library to be named greet_ext.so so we can import it with the name below.

test.py:

#!/usr/bin/python

import greet_ext

print greet_ext.greet()
  • This python script works for me if I put it in the same folder as the greet_ext.so wrapper library after it is built.

What I need to figure out
This is a nice, simple example to get started with, but I have to figure out more details.

  • How do I wrap functions that take/return C++ types? How about pointers and references to those types? How about global operators?
  • How does a wrapper library deal with C++ templates? Is it the case that you have to instantiate some of those template classes are just work with those when you’re in Python?
  • Is Boost.Python the right choice? There’s a fairly recent webpage that discusses SWIG versus Boost.Python, and I think I’ve made the right choice for my project.

I’m looking forward to working on this further. This probably will be one of the things I work on this coming Christmas break.

P.S. God WordPress is so annoying when it escapes your code when you toggle between visual and text editing modes. Note to self, don’t switch modes.

Finding the cutset with Boost

Personally, I’ve always been ashamed of not writing many programs to work with graphs, but being able to do figure this one out was really nice.

#include <boost/config.hpp>
#include <iostream>
#include <string>
#include <boost/graph/edmonds_karp_max_flow.hpp>
#include <boost/graph/adjacency_list.hpp>
#include <boost/graph/read_dimacs.hpp>
#include <boost/graph/graph_utility.hpp>

Here are the basic includes for the sample program.


// Use a DIMACS network flow file as stdin.
// Example file found inline at: http://lpsolve.sourceforge.net/5.5/DIMACS_maxf.htm
// Usage: max_flow < max_flow.dat
int
main()
{
  using namespace boost;

  typedef adjacency_list_traits<vecS, vecS, directedS> Traits;
  
  // define our graph with so-called internal properties
  typedef adjacency_list<listS, vecS, directedS, 
  // vertex properties
    property<vertex_name_t, std::string,
    property<vertex_color_t, default_color_type> >,
  // edge properties
    property<edge_capacity_t, long,
    property<edge_residual_capacity_t, long,
    property<edge_reverse_t, Traits::edge_descriptor> > > 
  > Graph;

  Graph g;

Strictly speaking, the graph itself is restricted to the first three template parameters. The first two parameters tell you how the edges and vertices are represented. In our case, they are both stored in std::vectors – the first two vecS are special types defined in Boost for that. There’s the usual tradeoffs to consider and it’s nice to not have to worry about it. The last parameter tells you if you have a directed or undirected graph – again, using a special Boost type.

All of the properties following the first three are internal properties, which can basically be thought of as associated data specific to either the vertices or the edges. They are internal properties because they are attached to the graph itself, but Boost gives you the option to keep it external if you want. There are a bunch of graph predefined properties that you only bring in when you run an algorithm that makes use of them. In particular, Edmonds-Karp max flow makes use of vertex colors internally.

  // make references to the internal properties of the graph
  property_map<Graph, edge_capacity_t>::type 
    capacity = get(edge_capacity, g); 
  property_map<Graph, edge_reverse_t>::type 
    rev = get(edge_reverse, g); 
  property_map<Graph, edge_residual_capacity_t>::type 
    residual_capacity = get(edge_residual_capacity, g); 
  property_map<Graph, vertex_color_t>::type 
    color = get(vertex_color, g); 

  Traits::vertex_descriptor s, t;

We get references to some of the properties for passing to the algorithm. In this way, we’ll retain the colored vertices and can get what we really want out of max flow, which is the cutset.

  // read in the graph from stdin
  read_dimacs_max_flow(g, capacity, rev, s, t);

  long flow = edmonds_karp_max_flow(g, s, t,
    capacity_map( capacity )
    .reverse_edge_map( rev )
    .residual_capacity_map( residual_capacity )
    .color_map( color ));

Here we load in the graph from a dimacs file. Go to the site in the header comment to get a sample file. We pass in all of our relevant data structures to edmonds_karp_max_flow, the last argument being all of the property maps bundled together using those helper functions that chain together.

  std::cout << "number of vertices: " << num_vertices(g) << std::endl;

  std::cout << "c  The total flow:" << std::endl;
  std::cout << "s " << flow << std::endl << std::endl;

  std::cout << "c flow values:" << std::endl;
  graph_traits::vertex_iterator u_iter, u_end;
  graph_traits::out_edge_iterator ei, e_end;

  const char* name = "abcdef";
  for (boost::tie(u_iter, u_end) = vertices(g); u_iter != u_end; ++u_iter)
  {
    for (boost::tie(ei, e_end) = out_edges(*u_iter, g); ei != e_end; ++ei)
    {
      if (capacity[*ei] > 0)
        std::cout << "f " << name[*u_iter] << " " << name[target(*ei, g)] << " "
                  << (capacity[*ei] - residual_capacity[*ei]) << " "
                  << "(" << residual_capacity[*ei] << ")" << std::endl;
    }
  }

Above is just printing out the flow. Notice how vertices returns a pair of vertex iterators. boost::tie is a macro that lets you assign multiple variables at the same time, like assigning tuples in Perl. You can see how the property maps work – they map the edge or vertex descriptor to the property associated with that descriptor.

  std::cout << std::endl << "the min cut:" << std::endl;
  for (boost::tie(u_iter, u_end) = vertices(g); u_iter != u_end; ++u_iter)
  {
    for (boost::tie(ei, e_end) = out_edges(*u_iter, g); ei != e_end; ++ei)
    {
      if (color[*u_iter] == color[s] && color[target(*ei, g)] == color[t])
      {
        // damn yeah
        std::cout << name[*u_iter] << "-" << name[target(*ei, g)];
        std::cout << " (" << capacity[*ei] << ")" << std::endl;
      }
    }
  }

Finally, this is how to actually get the edges that make up the cutset from the colored vertices. The vertices will be colored based on which partition it ends up being on, and the cut edges are precisely the ones that bridge between the partitions ie. the ones that go from a vertex of one color to a vertex of the other color.

Thoughts

I really had a tough time looking for the usable types and the interfaces to these types. The above program was mostly part of an example program in the documentation, tweaked to include the color map and the code that uses the information to extract the edges. It took my the longest time to figure out how to pass in the color map to the algorithm that I wanted it to use. Even then, I wasn’t sure that I would get something useful in return and it just took rounds of attempted compiles and runs to see what all of the code actually does. I feel like this was much harder than it should have been, but I wonder if it’s something that someone with experience with templated C++ would have an easier time with. It just seems like there’s nothing like a straightforward equivalent of the Java API.

Well let’s post this before I go crazy from the way the editor eats the templates in the C++ code when I toggle between visual and HTML editing.